Signs of a Bad Solar Installation in Tampa Bay Homes
If you are worried your solar was installed poorly, you are not alone. Installation problems tend to reveal themselves over time, often first at the roof, and most of them can be found and corrected with a careful inspection and the right repairs. Fused Solar and Roofing is a licensed roofing (CCC1331058), electrical (EC13014750), and building contractor (CBC1252064) — all three in-house.
This article is written for Tampa Bay homeowners who either had a system installed and now see things that do not look right, or bought a home with solar and are unsure how well it was put in. The goal is not to alarm you, but to give you clear signs to look for, explain what you can safely do, and outline what it takes to correct a poor installation when that is needed.
1. Most installation problems show up eventually
A solar system can look fine on day one and still have hidden issues. Many problems do not show themselves until months or years later. The system is exposed to sun, heat, wind, and rain every day, and those conditions slowly test every attachment, seal, and connection on your roof and around your home. When something was not installed well, time and weather tend to uncover it.
In the Tampa Bay area, heavy rains and strong sun are a constant. A mount that was only sealed on the surface can hold for a while, then begin to let water in as the sealant ages or shifts. Wiring that was left resting on the roof can slowly rub against roofing material as the wind moves it. Conduit that was not supported well can begin to sag or pull away from its attachments. None of this usually happens overnight, which is why you might not see anything wrong until well after the installation crew has left and the system has been operating for some time.
The same is true inside the home. A small leak around a roof penetration can take a long time to travel through the roof deck and insulation before it shows up as a stain on the ceiling. A loose piece of equipment on the exterior wall might not feel like a big deal at first, but can be a sign that the mounting or wiring behind it was not done as carefully as it should have been. Production issues can also be slow to notice, especially if you were never shown how to check your monitoring or compare your actual production to what you were told to expect.
📌 Key Takeaway: A poor solar installation usually reveals itself over time, and often as a roof problem before it becomes a solar problem.
2. Why the installation matters as much as the equipment
Solar panels and inverters are important pieces of equipment, and many of them are well-made. But the equipment alone does not decide how your system behaves on your roof. The installation determines how the system is attached to the roof, how the wiring is run and supported, and where the equipment is placed on your home. Those choices have a direct impact on whether your roof stays dry and whether the system keeps working as intended over time.
Roof attachment is more than just putting bolts into the structure. Each attachment point has to work with the specific roofing material on your home, whether that is shingle, tile, or another type. The installer decides which mounts to use, how to line them up with the rafters, and how to protect each penetration so water sheds properly. When those decisions are made thoughtfully, the solar array and the roof can work together for a long time. When they are rushed or improvised, the roof can become vulnerable even if the panels and inverters themselves are high quality.
Wiring is another area where installation matters. The installer chooses how the conduit runs across the roof and walls, how the wiring is supported under the panels, and where it enters and exits the home. Good routing keeps wiring off abrasive surfaces, avoids low points where water can collect, and keeps cables organized and supported. Poor routing can leave wires hanging, rubbing, or exposed to damage, which can create performance issues and additional wear over time. The placement of inverters, disconnects, and other equipment on the wall also affects how easy the system is to service and how well it stands up to the elements.
In short, the installation is the bridge between good equipment and a system that works reliably on your specific roof. Two homes with similar panels and inverters can have very different outcomes depending on how carefully the system was attached, wired, and laid out. When you are evaluating your own system, it is helpful to look not only at the panels themselves, but at how everything around them was put together.
Worried about how your solar was installed? Fused Solar and Roofing evaluates and corrects solar installations across Hillsborough, Pinellas, Pasco, and Manatee counties. Request a diagnostic visit at https://fusedsolarandroofing.com/solar-repair
3. Signs you can see from the yard
You can learn a lot about how your system was installed just by looking at it from the ground. You do not need to climb on the roof to notice several key warning signs. Take your time and look at the array from different sides of the house, staying on solid ground the entire time. What you are looking for is whether the system appears well supported, even, and cleanly integrated with the roof, or whether there are obvious signs of strain, damage, or neglect.
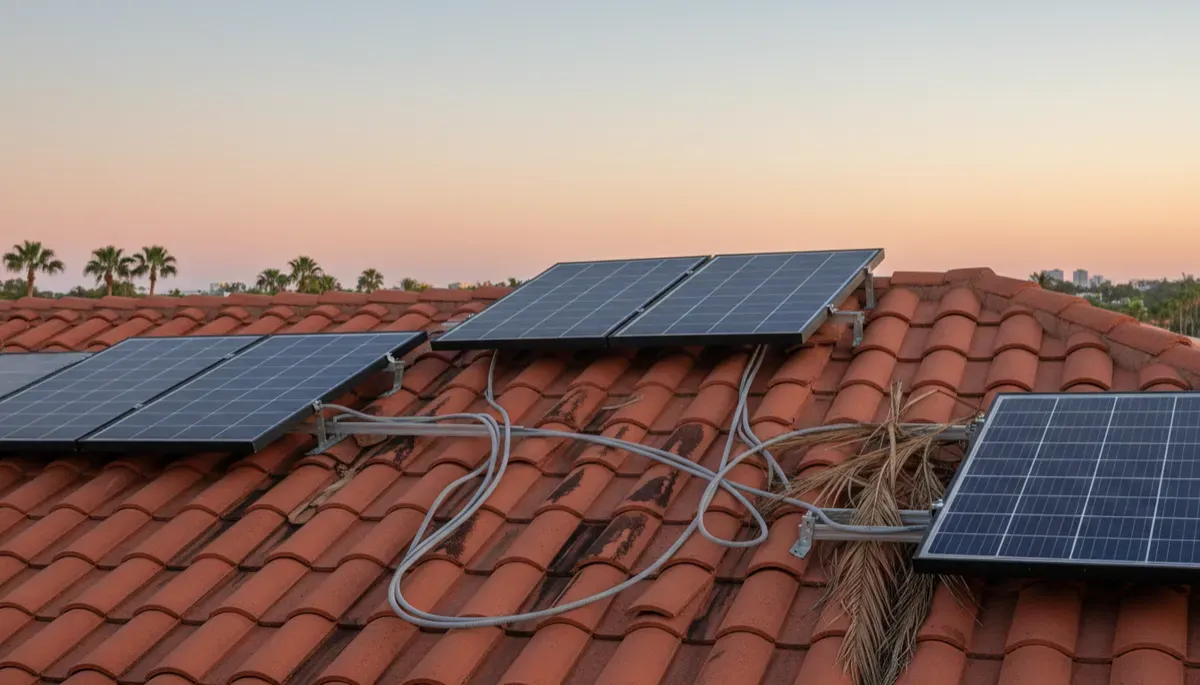
One of the first things to look at is the conduit on the roof. Conduit should be securely supported, not loose, sagging, or snaking across the roof without attachments. If you see conduit that dips between supports or appears to be resting directly on the roof in long stretches, that is a sign the installer may not have supported it properly. Over time, this can lead to wear on both the conduit and the roofing material where it touches or rubs.
Next, look under the panels as best you can from the yard. You should not see wires hanging down or visibly resting on the roof surface. Wiring should be managed so it stays tucked up near the panels and rails, not dangling in loops or touching the shingles or tiles. If you can clearly see cables drooping or lying on the roof, that is a sign the wire management under the array may not have been done carefully, and it is worth having checked by a professional.
Pay attention to how the panels sit on the roof. From the ground, the rows should look straight and even. If some panels appear tilted differently, sit noticeably higher or lower than their neighbors, or look shifted out of line, there may be issues with how the mounting hardware was set. Sometimes this can be cosmetic, but it can also be a sign that mounts were not aligned well with the roof structure or that adjustments were made to work around problems instead of correcting them properly at the attachment points.
Look for rust stains on the roof or on the visible mounting hardware. Rust on brackets, bolts, or rails can indicate that components are weathering in a way that should be checked. Rust streaks running down the roof from under the array can also point to metal parts deteriorating and staining the roof surface. While some discoloration can be cosmetic, visible rust is a clear sign that the system deserves a closer look to understand what is happening at and under the mounts.
Debris or nesting material collecting under the panels is another warning sign. Leaves, branches, and other debris can build up under an array if there are gaps where wind can blow it in but it cannot easily escape. Birds and small animals may also nest under panels if there are inviting openings. Besides being a nuisance, this buildup can trap moisture, put extra strain on the roof surface, and hide damage. If you see obvious piles of debris or evidence of nesting under the panels, that is something to mention when you schedule an evaluation.
Finally, look closely at the roof material around the array. On shingle roofs, check for cracked, broken, or missing shingles near the panels. On tile roofs, look for broken or displaced tiles around and under the array edges. Damaged roofing material near the mounts can be a sign that the roof was not handled gently during installation, or that mounts were forced into place without properly working with the existing roof. Any visible damage to the roofing around the system is worth taking seriously, even if you do not yet see a leak inside.
💡 Pro Tip: On a clear day, walk around the house and photograph the array from the yard on every side. Those photos let a technician see what you are seeing before the visit.
4. Signs inside and around the house
Some of the most important signs of a poor solar installation show up inside the home or on the walls around it. Start with the ceilings in the rooms under the array. Look for stains, discoloration, or areas where the paint or texture looks different from the surrounding surface. Even small, faint stains can be early signs of a leak that started at a roof penetration under the panels. Because water can travel along framing before it becomes visible, the stain may not be directly under a panel, but any new or unexplained ceiling mark below the array area deserves attention.
Next, walk outside and look at the equipment mounted on the exterior wall. This may include disconnects, inverters, or other boxes. These should be firmly attached, with covers closed and labels present and readable. If you see equipment that is loose, rusted, or missing labels, that can be a sign that the installation was not completed or maintained with care. Rust on enclosures, hinges, or fasteners can also suggest that water is getting to places it should not, especially if the equipment is exposed to rain without adequate protection from above or around it.
Look at the conduit on the walls as well. Conduit should be supported at reasonable intervals and should run in a clean, deliberate path. If you see conduit that bows out from the wall, has long unsupported spans, or appears to be pulling at its connections, it may not have been secured properly. Over time, gravity and weather can make these issues worse, so it is better to have them checked before they lead to more serious problems with the wiring inside or the attachments to the wall and roof transitions.
Production concerns are another clue. If your system’s production has been lower than expected from the beginning, that can point to installation issues, configuration problems, or both. This is especially true if you were given an estimate of expected production and your actual numbers have never come close, even in good weather. Sometimes this is due to shading or design choices, but it can also be related to wiring problems, misconfigured equipment, or other installation-related factors that a technician can investigate during an evaluation.
Monitoring is another area where poor installations show up. If monitoring was never set up, never worked, or you were never shown how to use it, that can leave you in the dark about how your system is performing. A complete installation should include showing you how to see your system’s production, whether that is through a monitoring app or another method. If you do not have access to any monitoring, or if the system has been offline since the beginning, that is worth mentioning when you talk with a service company about an evaluation.
Finally, consider the paperwork and orientation you received. If you have no paperwork, no layout of the system, and were never walked through the equipment, that does not automatically mean the installation was poor, but it does make it harder to understand what you have. When a homeowner buys a house with existing solar, it is common not to know who installed it or what was done. In that situation, having a professional evaluation can provide a clear picture of the system, its condition, and any issues that should be addressed.
5. What you can safely do
There are a few practical steps you can take as a homeowner to gather information without putting yourself at risk or accidentally making things worse. The goal is to document what you see and collect any information you already have, so a technician can review it and be prepared before visiting your home. None of these steps require tools, and none of them involve touching the system itself beyond using your phone or computer to look at information that is already available to you.
First, photograph the array from the yard on every side where it is visible. Stand in safe, stable spots and take clear photos that show the panels, the edges of the array, any visible conduit on the roof, and any areas where you see debris, rust, or damage. These photos do not need to be artistic; they just need to be clear. They help a technician understand the layout of your system and see the same concerns you are seeing before they arrive, which can make the evaluation more efficient and focused on the right areas.
Second, photograph the equipment on the wall. Include any inverters, disconnects, or other boxes related to the solar system. Try to capture the labels if they are present, as well as any areas where you notice rust, loose hardware, or missing covers. These images can help identify the type of equipment you have and give clues about how the system was originally set up. Again, you do not need to open anything or take anything apart; just photograph what you can see from the outside.
Third, gather any paperwork you have. This might include contracts, proposals, system layouts, inspection reports, or manuals that came with the system. Even if you only have a few pages, they can provide useful information about the system size, the general design, and any notes from the original installation. If you bought the house with solar already on it, check any closing documents or folders you received to see whether the previous owner left solar paperwork behind. Having whatever you can find ready for a technician to review is helpful, even if it is incomplete.
Finally, if you have a monitoring app or online portal, check your production. Look at recent days, weeks, and months if possible. Note any long gaps where production appears to have dropped sharply or stopped, especially if there was no obvious reason such as a major storm or a long power outage. If you were given an estimate of expected production, compare your actual numbers to that estimate. You do not need to diagnose the cause; just be ready to share what you see with the technician during the evaluation.
⚠️ Warning: Do not climb onto the roof, apply sealant around mounts, or tie up loose wiring yourself. Solar wiring can be energized whenever the panels are in sunlight.
6. Why roof attachment is where poor installs cost the most
Every place the mounting system attaches to the roof is a penetration through the roof. These penetrations are necessary to secure the array, but each one has to be handled carefully. The goal is to create a secure attachment to the structure while still letting the roof do its job of shedding water. That means more than just driving a fastener and covering it with sealant. It means using flashing that is properly integrated with the roof material so water naturally runs over and away from the penetration, not into it.
Proper flashing is designed to work with the type of roof you have and to sit in the correct layers of the roofing system. When this is done correctly, the roof’s ability to keep water out is preserved. When attachments rely mainly on sealant applied on the surface, they are more vulnerable as time and weather act on that sealant. Sealant can be a useful part of a system, but it should not be the only thing standing between your home and a leak. Surface-only solutions can hold for a while, then slowly break down, sometimes without any obvious sign until water has already found its way in under the array.
When attachments are not done properly, leaks can develop slowly and stay hidden under the panels until they show up as a ceiling stain or damaged decking. Because the panels cover the area where the mounts are, you may not see any obvious problem from the ground. Water can travel along the roof deck, insulation, and framing before it appears inside. By the time you notice a stain, the wood around the penetration may already have been exposed to moisture for some time. That is one reason attachment issues can be among the most costly to correct: they can affect both the roof structure and the interior finishes if left unaddressed.
Wiring and conduit near the roof also matter. Wiring that rests on or rubs against the roof, or conduit that is not supported, can wear over time as wind and heat move the materials. The roof surface itself can be damaged by constant contact with moving cables or unsupported conduit. At the same time, the wiring insulation and conduit can suffer from that friction and movement. Correcting these problems usually requires both roofing and electrical work, because the solution often involves adjusting mounts, replacing damaged roofing material, and re-routing or re-supporting the wiring so it no longer rests on the roof or pulls at its connections.
Fused Solar and Roofing services systems of all brands, including systems whose original installer is no longer in business. Because attachment and roof-related issues touch both the structure and the electrical system, having a company that understands both sides is important. Fused Solar and Roofing is a licensed roofing (CCC1331058), electrical (EC13014750), and building contractor (CBC1252064) — all three in-house.
7. What a system evaluation involves
When you schedule a system evaluation, the goal is to understand the condition of your solar installation from end to end. A licensed technician visually inspects the array, the visible attachment points and flashing, the roof surface around the array, the wiring and conduit, and the equipment on the wall. They also review any paperwork and monitoring information you have, so they can compare what was planned or expected to what is actually installed and how it is performing today. This combination of on-site observation and document review gives a more complete picture than either one alone.
During the inspection, the technician looks for the kinds of warning signs described earlier: loose or unsupported conduit, wiring that appears to rest on the roof, uneven panels, damaged roofing material around the mounts, rust on hardware, and issues with the equipment on the wall such as loose enclosures or missing labels. They also look at how the flashing is integrated with the roof where it is visible, and whether the overall layout of the system makes sense for the roof and the home. If you have monitoring, they may review recent production trends with you to see whether there are patterns that match what they see on site.
After the evaluation, you receive photographs and a detailed written report. The report explains what was found, highlights any areas of concern, and outlines recommended corrections if they are needed. Any correction is scoped and quoted from the findings, so you can see clearly what is being proposed and why. This helps you make an informed decision about how to proceed, whether that means addressing a specific leak, improving wire management, or planning a more involved detach and reinstall if the attachment issues are more widespread under the array. Attachment points and wiring under the panels cannot be fully seen without removing panels, so the report will also note where additional findings may be uncovered once panels are taken off as part of a repair.
Fused Solar and Roofing is an EnergySage Elite Installer with a 5.0/5 rating and 21+ verified reviews — independent verification, earned not purchased.
📌 Key Takeaway: Fused Solar and Roofing evaluates and corrects solar installations of all brands under roofing license CCC1331058 and electrical license EC13014750, including systems whose original installer is no longer in business.
8. When the fix means taking the panels off
Some problems can be addressed with adjustments or repairs around the edges of the array, but when the issues are at the attachment points, in the flashing, or in the wiring under the array, the panels in that area have to come off to correct them. This is called a detach and reinstall. It is a more involved process than a simple service visit, but it is often the right way to solve deeper roof and attachment problems instead of just treating the symptoms at the surface. The goal is to restore both the roof and the solar system to a condition where they can work together reliably going forward.
In a detach and reinstall, the system is shut down and made safe before any work begins. The panels are then carefully removed and set aside so the roof under them is fully accessible. With the panels off, the roof can be inspected directly, including the decking, underlayment, and any damaged roofing material around the mounts. This is when leaks, soft spots, or other hidden issues around the attachment points can be fully seen and properly addressed, rather than guessed at from the edges of the array or from inside the home after water has already traveled through the structure.
Once the roof is exposed, the attachments are corrected with properly flashed mounting. That means setting mounts in a way that works with the roof system, integrating flashing so water sheds naturally, and replacing any damaged roofing material around the penetrations. At the same time, the wiring is corrected and supported. Cables that were resting on the roof can be lifted and secured, conduit runs can be adjusted and supported, and any damaged or strained sections of wiring can be addressed. This combined roofing and electrical work is what turns a patchwork fix into a long-term solution for both the roof and the solar system above it.
After the roof repairs and attachment corrections are complete, the panels are reinstalled, reconnected, and tested. The array is set back on properly aligned rails, wiring is routed and supported as planned, and the system is brought back online. Testing confirms that the system is operating as expected after the work. For many homeowners, this process brings peace of mind, because they know the issues under the array have been addressed directly rather than covered up or left to worsen out of sight over time.
If the roof under the array is older or damaged, having the panels off is the natural time to ask whether it should be replaced before they go back on. This is not about pushing a new roof; it is about recognizing that the panels act like a cover over that part of the roof. Once they are reinstalled, accessing that area again requires another detach. Asking the question now allows you to weigh whether it makes sense to address roof concerns at the same time, so you are not facing another round of panel removal sooner than necessary. A straightforward conversation with your contractor about the condition of the roof and your plans for the home can help you decide what is right for you.
Fused Solar and Roofing's own in-house electrical and roofing crews handle the whole job, so it is one job under one company. That means the same team is responsible for shutting down and removing the system, repairing the roof, correcting the attachments and wiring, and reinstalling and testing the array. For a homeowner, this simplifies communication and coordination, and it helps ensure that the roof work and the solar work are planned together from the start rather than treated as separate projects.
Frequently Asked Questions
1. How can I tell if my solar panels were installed correctly?
From the ground, a well-installed system usually looks even, well supported, and cleanly integrated with the roof. Conduit should not be sagging, and you should not see wires hanging below the panels or resting on the roof. The roof material around the array should not be cracked or broken, and equipment on the wall should be firmly attached with labels present. Inside the home, you should not see new ceiling stains under the array. The most reliable way to tell, though, is to have a licensed technician perform a system evaluation and provide a written report on the condition of the installation, since many important details are not visible from the ground or from inside the house.
2. Can a poor solar installation cause roof leaks?
Yes, a poor solar installation can contribute to roof leaks, especially if the roof attachments were not flashed and integrated properly with the roofing system. Every mount is a penetration through the roof, and if those penetrations rely mainly on surface sealant or were not installed with care, water can eventually find a path in. These leaks often develop slowly and may stay hidden under the panels for some time before showing up as ceiling stains or soft spots in the roof deck. A professional evaluation can help identify whether leaks are likely related to the solar attachments and what it would take to correct them.
3. Is loose or hanging wiring under my solar panels dangerous?
Loose or hanging wiring under your solar panels is a concern and should be checked by a professional. Wiring that is not properly supported can rub against the roof or other hardware as the wind moves it, which can cause wear over time. It can also put strain on connections where the wiring enters junction boxes or conduit. You should not try to tie up or move loose wiring yourself, because solar wiring can be energized whenever the panels are in sunlight. Instead, document what you see from the ground and schedule a service visit so a licensed technician can safely correct the wire management and address any related issues.
4. What should I gather before having my solar installation checked?
Before your installation is checked, it is helpful to gather clear photos of the array from the yard on every side, photos of the equipment on the wall, and any paperwork you have related to the system. This includes proposals, layouts, contracts, or manuals. If you have a monitoring app or online portal, review your production and note any long gaps or unusual drops. You do not need to diagnose anything yourself; simply having this information ready gives the technician a head start and helps them understand your system and your concerns more quickly during the evaluation visit.
5. Does fixing a poor installation mean removing all of the panels?
Not always. Some issues, such as loose conduit on the wall, missing labels, or certain types of monitoring problems, can sometimes be addressed without removing panels. However, when the problems are at the attachment points, in the flashing, or in wiring that runs under the array, the panels in those areas do need to come off to correct the issues properly. That is a detach and reinstall. The evaluation report will explain whether your specific situation calls for panel removal and, if so, whether it involves a portion of the array or the entire system, based on where the issues are found and how extensive they are.
6. My original solar installer is out of business. Who can check my installation?
If your original installer is out of business, you can contact a company that services systems of all brands and is experienced with both roofing and electrical work. Fused Solar and Roofing evaluates and corrects installations regardless of who originally installed them, including systems where the installer is no longer operating. A licensed technician can inspect the array, roof attachments, wiring, and equipment, review any paperwork you have, and provide a written report with findings and recommendations so you know where you stand and what your options are for repairs or improvements.
Fused Solar and Roofing is a licensed electrical contractor (EC13014750) servicing solar systems of all brands across Hillsborough, Pinellas, Pasco, and Manatee counties, including systems whose original installer is no longer in business. Request a diagnostic visit at https://fusedsolarandroofing.com/solar-repair
Is your solar system producing what it should? Request a diagnostic visit at https://fusedsolarandroofing.com/solar-repair
